# Beginner's Guide
# Creating a First Draft
Manually drafting legal agreements is costly, inefficient, and increases the risk of errors in the drafting process. With our legal automation tools, anyone can turn complex and static legal documents into dynamic, fill-in templates with the click of a button. Create a First Draft and make the most out of your client relationships by adding some of our basic markup language features to your legal agreements. For more information on these features and instructions on how to use all of our markup language, check out the complete guide.
# Automate Legal Agreement Terms
# Step 1: "Start a New Template" or Go to the "Edit" View of any Template
The OpenLaw markup language can be added to your legal agreement by first clicking on "Start a New Template" in the nav menu:
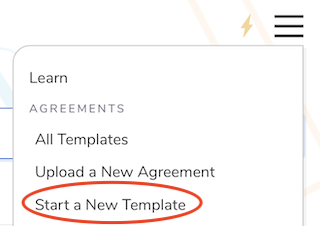
or by going to an existing template's "Edit" view, which is accessible in the action toolbar for that template.

# Step 2: Bracket Desired Text
Easily transform any word or phrase in your legal agreement into a fill-in field by surrounding the text with a set of double brackets. Adding double brackets around legal prose transforms natural language into machine-readable objects called variables. Consider the following basic contractual language from a mutual non-disclosure agreement (NDA):
This Mutual Non-disclosure Agreement (this “Agreement”) is entered into as of
March 20, 2019 (the “Effective Date”), by and between ABC, Inc., a Delaware
corporation with its principal place of business at 123 Street, New York, NY
11111 (the “Company”) . . .
Replacing March 20, 2019 with [[Effective Date: Date]] results in:

Replacing ABC, Inc. with [[Company Name]] results in:

Replacing 123 Street, New York, NY 11111 with [[Company Address: Address]] results in:

# Creating Descriptive Fill-in Fields
One can vary the text that appears in the automatically generated form by including the desired description in the bracketed field. Simply add the desired language in quotes in the bracketed field after the defined text. If you would like to see "What is the name of the Company?" in the fill-in field, simply add [[Company Name "What is the name of the Company?"]] wherever you would like to see it in the text of the edit view of the agreement. This will result in:

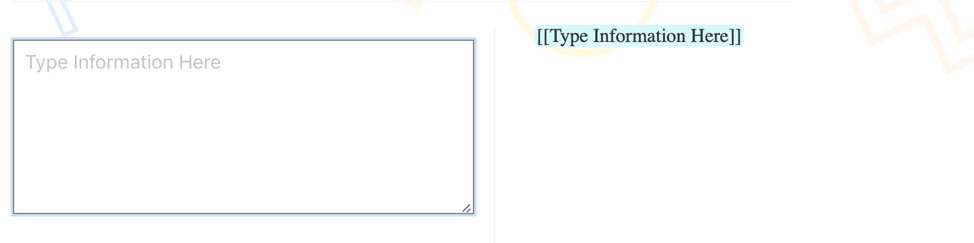
# Creating Fill-in Fields that Contain More Text Space
If you would like to create a fill-in field that appears as a large text box, simply add : LargeText after the defined term. For example, [[Type Information Here: LargeText]] results in the following:
# Creating Auto-fill Fields
If there is a field that you would like to be auto-filled with a word or phrase, add double brackets around the desired text and add : Text, followed by the desired output in quoted parenthesis. For example, [[Governing Law: Text("State of New York")]] will fill in the field with "State of New York." Users filling in the template will still have the option to change the fill-in field when filling out the template.

# Number Fields
Adding : Number after the defined text will indicate that the automated fill-in field should be an integer or decimal number. For example, [[Purchase Price: Number]] will display numbers with appropriate commas.

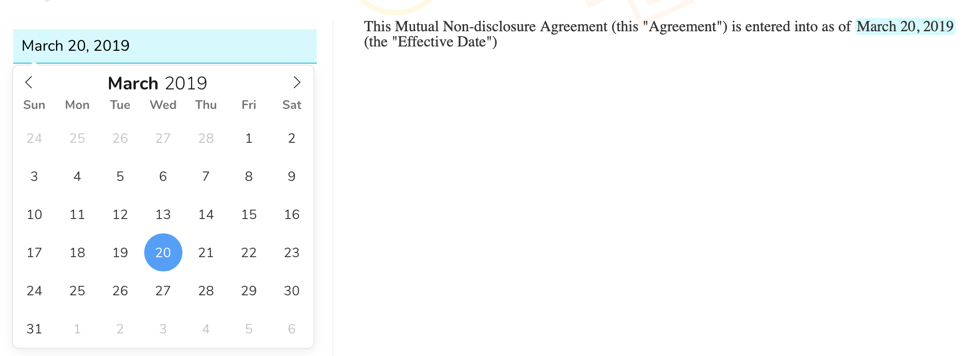
# Date Fields
Adding : Date after the defined text name will transform your fill-in field into an easy-to-use date picker, which will display month, day, and year. For example, [[Effective Date: Date]] becomes:
# Date and Time Fields
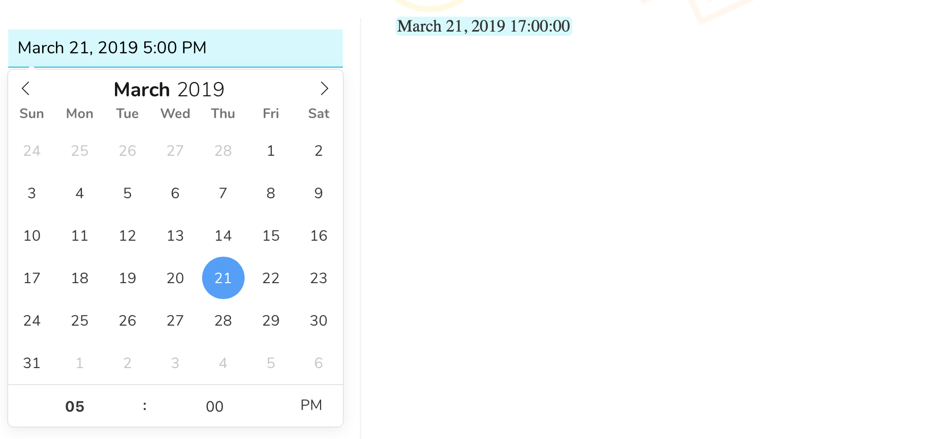
If you are seeking to set a specific date and time, adding : DateTime after the defined text name will create a date picker that allows you to choose the date and time to be included in a First Draft. For example, adding [[End Date: DateTime]] will result in a menu similar to the following:
# Address Fill-in
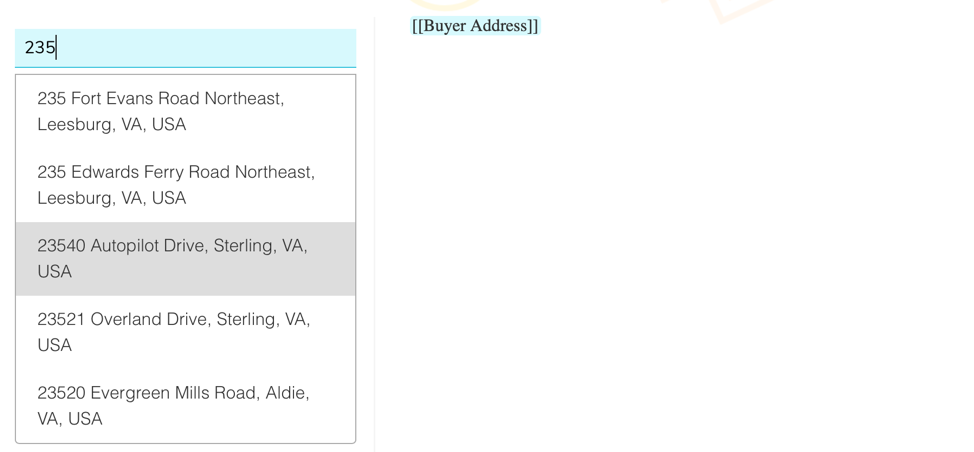
The address fill-in transforms a fill-in field into an address bar that allows you to search for an address using the Google Maps API. Simply add : Address after your defined text name. For example, [[Buyer Address: Address]] becomes:
# Including an Ethereum Address
To include an Ethereum address fill-in field, add : EthAddress after the defined text. Including : EthAddress requires the individual who is filling in the template to add a valid Ethereum address in the fill in field. The fill-in field will appear the same as any other defined text variable where a user may fill in the desired address. For example, [[Ethereum Address: EthAddress]] becomes:

# Adding Images
To upload an image, add : Image after the defined text. For example, [[Company Logo: Image]] creates a button that permits you to search your files and upload any image.

# Drop-down Menus
Add drop-down menus into your template by following the steps below.
# Step 1: Add Sample Drop-down
Copy and paste the following into your template:
[[Choice Variable Name: Choice("option 1", "option 2", "option 3")]]
[[Selected Option Variable Name: Choice Variable Name]]
or
Select the boxed arrow in the editor toolbar of any template:

# Step 2: Define What You Would Like Your Drop-down Menu to Ask
The Choice Variable Name in the sample drop-down menu is how you can define the text name. Remember to choose the same text name for both fields.
Selected Option Variable Name is where you add what you would like to include above the drop-down menu.
For example,
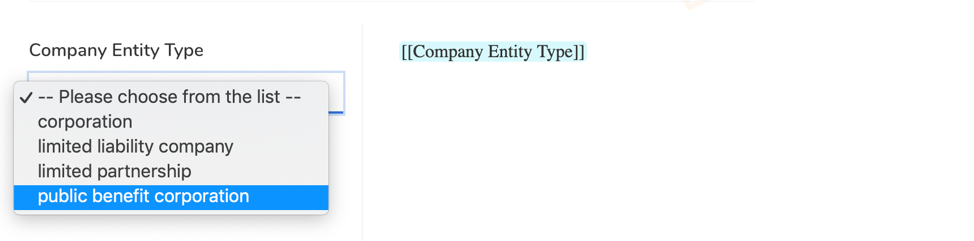
[[Entity: Choice("corporation", "limited liability company", "limited partnership", "public benefit corporation")]]
[[Company Entity Type: Entity]]
creates a drop-down menu allowing the user to choose what entity type should be included in the template. The example above will result in the following drop-down menu:
# Step 3: Include the Drop-down Menu within the Text of an Agreement
At the very top of the template, add the following:
<%
[[Entity: Choice("corporation", "limited liability company", "limited partnership", "public benefit corporation")]]
[[Company Entity Type: Entity]]
%>
When you get to the text where you would like to have a drop-down menu, include the second bracketed item from above. Simply add [[Company Entity Type: Entity]] in the template editor similar to the following:
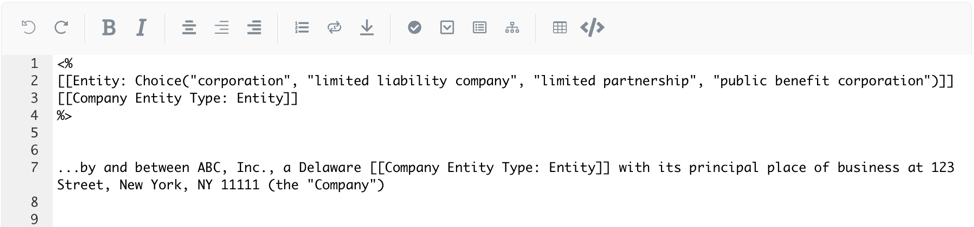
The above markup results in the drop-down menu below.

# Conditional Responses
Adding conditionals allows users to select what language is included in a First Draft. When a user selects "Yes", the conditional will output the selected information that you have decided to include in the conditional.
# Step 1: Add Sample Conditional
Copy and paste the following into your template:
{{Name of Conditional “Question to Prompt User?” =>
Text that you would like to include if a user selects 'yes'}}
or
Select the check mark circle in the editor toolbar of any template:

# Step 2: Name the Conditional and Add the Desired Language to be Inserted when a User Selects "Yes"
If you would like the user to have the option to include a specific provision such as an affiliate provision, simply include the text after the arrow =>.
For example,
{{Affiliate Definition “Would you like to include a definition for an Affiliate?” =>
“Affiliate” shall mean an affiliate of, or person affiliated with, a specified
person, is a person that directly, or indirectly through one or more intermediaries,
controls or is controlled by, or is under common control with, the person specified.}}
will result in the following:

# Signatures
Including electronic signature markup within a template allows any party to electronically sign the agreement through an email identity. An electronic signature can be embedded into an agreement template by including : Identity | Signature after a variable name as shown in the following example:
**[[Party A | Uppercase]]**

[[Party A Signatory Email: Identity | Signature]]

_______________________
By: [[Party A Signatory Name]]
Title: [[Party A Signatory Title]]

**[[Party B | Uppercase]]**

[[Party B Signatory Email: Identity | Signature]]

_______________________
By: [[Party B Signatory Name]]
Title: [[Party B Signatory Title]]
# Formatting
# Bold
To bold text, simply add two asterisks ** both before and after the relevant language. For example, **This Agreement** becomes "This Agreement" in the agreement text.
# Italic
If you would like to italicize text, you can simply add one asterisks * both before and after the relevant language. For example, *however* becomes "however" in the agreement text.
# Bold and Italic
For this type of formatting, simply surround the relevant text with three asterisks *** both before and after the relevant language. For example, ***emphasized text*** becomes "emphasized text" in the agreement text.
# Underline
To underline text, just add __ (two underscores) before and after the desired content. For example, __This text is underlined for emphasis__ becomes "This text is underlined for emphasis" in the agreement text. If you would like to apply multiple formatting styles, just apply the relevant syntax around the text. For example, __**This text is underlined and bold for more emphasis**__ become "This text is underlined and bold for more emphasis" in the agreement text.
# Uppercase
To display text in all caps, simply add | Uppercase after the defined text. For example, [[Party A | Uppercase]] becomes "PARTY A" in the agreement text.
# Alignment
# Centered
To center text such as titles and headings, add \centered before the relevant text. For example, \centered **Agreement Title** will center and bold the relevant text in the agreement.
# Right Align
To right align text, add \right before the relevant text.
# Other Alignment Options
Adding \right-three-quarters before the relevant text will position the text to be three-quarters aligned to the right. This may be helpful in positioning signature blocks in an agreement.
# Page Break
If you would like to add a page break to an agreement, such as separating an exhibit from the main body of the agreement, you can simply add \pagebreak where the break should be located in the template.
# Sections and Subsections
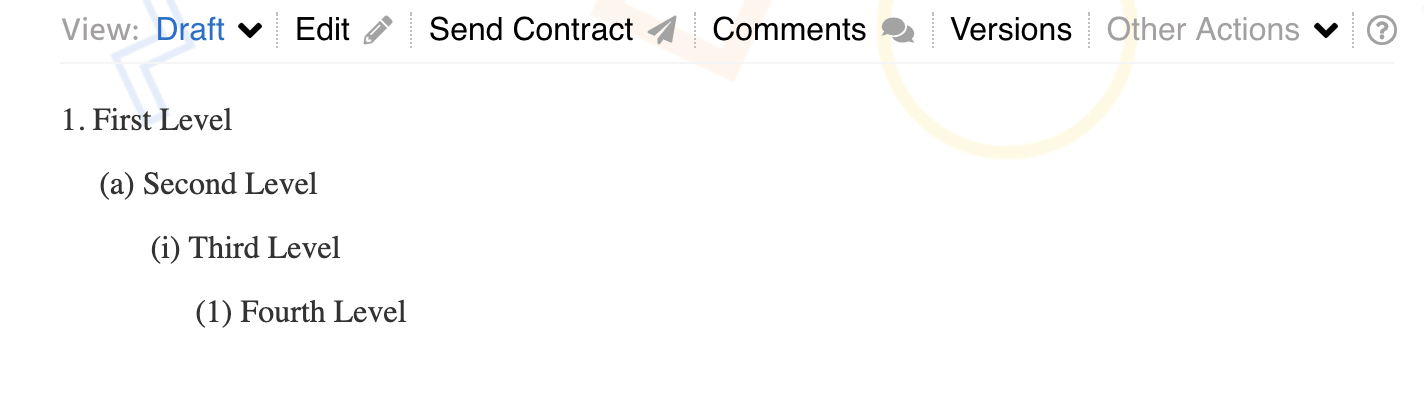
Organizing an agreement into sections and subsections is straightforward. Currently, we offer four section levels, which can be invoked using the appropriate number of ^ before the section heading.
For example,
^First Level

^^Second Level

^^^Third Level

^^^^Fourth Level
will result in the following: