# Markup Language
The OpenLaw protocol relies on a markup language to transform natural language agreements into machine-readable objects with relevant variables and logic defined within a given document (what we call a "template"). Templates can be grouped together into "deals," making it possible for parties to create and manage entire transactions on a blockchain.
If you're new to OpenLaw, please see the Beginner's Guide for help with using some of the more basic markup language features to create a First Draft. If you're ready to go further, this complete guide offers more information on how to use all the features of our powerful markup language to create dynamic, blockchain-enabled legal agreements.
# Variables
# Generally
To identify a variable in an OpenLaw template, all that is required is to surround text with a set of double brackets. For example, consider the following basic contractual language from a mutual non-disclosure agreement (NDA):
This Mutual Nondisclosure Agreement (this "Agreement") is made as of May 17,
2017, by and between ABC, Inc. (the "Company"), and John Smith ("Counterparty").
Each party has disclosed and/or may further disclose its Confidential
Information (as defined below) to the other in connection with the Relationship
(as defined below) pursuant to the terms and conditions of this Agreement. As
used herein, the term "Discloser" shall refer to the Company whenever the
context refers to the Company's Confidential Information being disclosed to
Counterparty, which is referred to as "Recipient" in that context. Conversely,
the term "Discloser" shall refer to Counterparty whenever the context refers to
Counterparty's Confidential Information being disclosed to the Company, which is
referred to as "Recipient" in that context.
Any of the words in this text can be transformed into a variable. If we chose to identify the parties to the agreement as variables we could, for example, replace "ABC, Inc." with [[Company Name]], "John Smith" with [[Counterparty]], and "May 17, 2017" with [[Effective Date: Date]].
This Mutual Nondisclosure Agreement (this "Agreement") is made as of [[Effective
Date: Date]], by and between [[Company Name]] (the "Company"), and
[[Counterparty Name]] ("Counterparty"). Each party has disclosed and/or may
further disclose its Confidential Information (as defined below) to the other in
connection with the Relationship (as defined below) pursuant to the terms and
conditions of this Agreement. As used herein, the term "Discloser" shall refer
to the Company whenever the context refers to the Company's Confidential
Information being disclosed to Counterparty, which is referred to as "Recipient"
in that context. Conversely, the term "Discloser" shall refer to Counterparty
whenever the context refers to Counterparty's Confidential Information being
disclosed to the Company, which is referred to as "Recipient" in that context.
Once identified, the variable can be transformed into a form element in our contract generation application, which is accessible through OpenLaw's contract creation application's "Draft View." As you'll note in the above, by default, the name of the variable is pre-populated as the form's value to prompt a user seeking to generate a contract.
If, however, the name of the variable is not descriptive, you can vary the text that appears in the automatically generated form by including a string after the variable name. For example, [[Company Name "What is the name of the company?"]] or [[Company Name "What is the name of the counterparty?"]].
For a Text variable, you can also define a default value by including a string as a parameter when defining the variable. For example, [[Company Name: Text("ABC, Inc.")]]. The value of the variable will be "ABC, Inc." if no other input is provided.
# Other Input Variable Types
In addition to Text variables, OpenLaw supports several other input variable types, including Date, DateTime, Number, EthAddress, Address, and Period types. These variables provide additional functionality, and over time, we intend to extend our markup language to incorporate other types.
# Number
The Number type indicates that a variable should be an integer or decimal number. You may choose to rely on this type if you need to perform basic calculations. To create a Number variable just include : Number after a variable name: [[Variable: Number]].
The value of an integer input will be displayed as a comma separated number. For example, an input of 1000000 will be formatted as 1,000,000 in the agreement. If you wish to omit the commas in a displayed integer number, you can define the Number variable as [[Variable: Number | raw]].
After a Number variable has been defined, you can also display the input for that variable as a rounded number with the ability to specify the precision. For example, [[Variable | rounding(2)]].
TIP
Rounding is a formatting tool to display the Number variable and does not redefine the value of the variable. For example, if the variable Num is defined as [[Num: Number]] and the user inputs 1.23456 for that variable, [[Num | rounding(2)]] will display 1.23 but the value of Num will remain equal to 1.23456.
You can define a default value for a Number variable by including an integer or decimal number as a parameter when defining the variable. For example, [[Num: Number(10)]]. The value of the variable will be 10 if no other input is provided.
# Date
The Date type is a basic input variable. This type transforms an input in an easy-to-use date picker. To create a Date variable, simply add : Date after a variable name. In other words, [[Variable: Date]].
You can define a default value for a Date variable by including a date as a parameter (in the "YYYY-MM-DD" format) when defining the variable. For example, [[Effective Date: Date("2018-08-01")]]. The value of the variable will result in a date of "August 1, 2018" if no other date is set.
There are several formatting options for Date values. They are specified by including the format at the end of the variable like so: [[Effective Date: Date | year]].
The available formatting options are:
year- displays only the year of the Date with 4 digits, ex.2019day- displays the day of the month in 2 digits, ex.14or02day_name- displays the full name of the day of the week, ex.Saturdaymonth- displays the month of the year in 1 or 2 digits, ex.1or11month_name- displays the full month name, ex.December
# DateTime
OpenLaw has created a variation of the Date type, called DateTime. The DateTime type allows a user to set not only a specified date, but also a specified time. To create a DateTime variable, add the words : DateTime after the variable name: [[Variable: DateTime]]. The DateTime type is useful when triggering or calling an Ethereum smart contract.
Similar to a Date variable, you can also define a default value for DateTime variable by including a date and time as a parameter (in the YYYY-MM-DD hh:mm:ss format) when defining the variable. For example, [[Effective Time: DateTime("2018-08-01 13:45:00")]]. The value of the variable will result in a date and time of "August 1, 2018 13:45:00" if no other input is provided.
# Period
The Period type allows a user to set a specific time period in seconds, minutes, hours, days, weeks, months, and years (e.g., 30 seconds, 1 minute, 5 hours, 7 days, 2 weeks, 6 months, 1 year). The Period variable also accepts mix time units for the input (e.g., 2 minutes 30 seconds, 1 week 3 days). To create a Period variable, add the words : Period after the variable name: [[Variable: Period]].
As described further below, you can use the Period type together with the Date and DateTime types to calculate past and future dates and times.
# Ethereum Address
The Ethereum Address type indicates a variable that should be an Ethereum address. This type becomes particularly relevant if you are using OpenLaw to send ether or tokens to a specific Ethereum Address. The syntax for this type is : EthAddress. In the context of a variable it would be [[Variable: EthAddress]].
# Address
The Address type is a more advanced input variable. This type transforms an input in an address box where you can search for a relevant address using the Google Maps API. Creating an Address type is fairly straightforward, simply add : Address after a variable name. In other words, [[Variable: Address]].
Once an address is defined, in addition to displaying the entire formatted address, you can access different aspects of the address, including the street number, street name, city, state, zip code, and country. Below is an example of how you would reference these elements:
Formatted Address: [[Company Address: Address]]
Street Number: [[Company Address.streetNumber]]
Street Name: [[Company Address.streetName]]
City: [[Company Address.city]]
State: [[Company Address.state]]
Zip Code: [[Company Address.zipCode]]
Country: [[Company Address.country]]
Each address is also associated with a unique string identifier. Continuing the example above, this can be referenced with [[Company Address.placeId]].
# LargeText
The LargeText type is used when more space is required than the default Text variable would provide. It corresponds to a <textarea> tag in HTML, rather than <input>.
To create a LargeText variable, add : LargeText after the variable name: [[Variable: LargeText]].
# Image
The Image type is used to embed a graphic image as a header or in the body of a template. To create an Image variable, add : Image after the variable name: [[Variable: Image]]. The variable will generate a clickable interface in the form to select an image file (GIF, PNG, JPG, BMP, or TIFF) to upload. The user will have the ability to crop the image before it is embedded in the template. The interface will also allow the user to further edit or delete the image.
You can define a default value for an Image variable by including a valid URL that resolves to a GIF, PNG, JPG, BMP, or TIFF image as a parameter when defining the variable. For example, [[Variable: Image("http://www.example.com/header_image.png")]]. In the case of a default value, the remote image will already be embedded in the template but the interface to edit the image will be disabled.
# Link
The Link type is used to insert a hyperlink in the agreement text. To create a Link variable, add : Link after the variable name and include a label and url: [[Variable: Link(label: "OpenLaw"; url: "https://openlaw.io")]]. The label is the actual text for the hyperlink that will be rendered in the agreement. You can insert the same link elsewhere in the agreement by just referencing the variable name: [[Variable]].
# YesNo
The YesNo type is typically used together with "conditional" logic embedded into a template. It creates a binary "yes" or "no" question with radio button inputs. The value of the input can be used to output text, variables, smart contract calls, and/or trigger a conditional elsewhere in the agreement as explained below in Conditionals and Decision Branches. To create a YesNo variable, add : YesNo after a variable name followed by the language in quotes that serves as a prompt for the user. For example, [[Variable: YesNo "Have you included the required prompt?"]].
# Summary of Input Variable Types
no type indicator or : Text - indicates that a variable is text
: Address - generates an address
: Date - generates date picker
: DateTime - generates date picker with date and time
: EthAddress - indicates that a variable is an Ethereum address
: Image - generates a clickable interface to upload and edit an image
: LargeText - indicates that a variable is large text (corresponding to a text box where longer input is accepted)
: Link(label: "<label>"; url: "<url>") - generates a hyperlink
: Number - indicates that a variable is a number
: Period - indicates that a variable is a time period
: YesNo "<user prompt>" - generates binary question with radio button inputs
WARNING
When creating an input variable name, you cannot use any special characters, such as !#.,_@-. If you attempt to do so, the parser will pop an error.
# Specialized Types
In addition to the input variable types explained above, you can also define certain specialized types. These metatypes further enhance the dynamism of a legal template.
# Validation
You can use a Validation type to add a constraint on a variable or a dependency between variables to make sure that the input values make sense. In other words, a Validation type can be used to make sure some rules apply to a certain expression.
A Validation type takes two parameters:
- condition: The expression to evaluate, which needs to be of a YesNo type.
- errorMessage: The message that should be displayed if the condition evaluates to No (false). The errorMessage is also an expression of type Text and can include other variables.
For example:
[[X: Number]]
[[Y: Number]]

[[_: Validation(
    condition: (X + Y) < 20;
    errorMessage: "The sum of X and Y needs to be less than 20 but is " + (X + Y)
    )]]
TIP
If the condition cannot be resolved yet (because an input is missing), a validation error will not be triggered.
# Collection
When you want the user to input a list of values, you can do it by using the Collection metatype. On the input side, the user will be able to add/edit/remove elements. On the markup side, you will be able to iterate on each element.
A Collection needs a type parameter which specifies what kind of elements it has. A Collection can only contain one kind of element. To define a Collection, add : Collection<Element Type> after the variable name. For example, [[Employees: Collection<Text>]].
# for each block
If you have a Collection, you can iterate on each element by using a for each block. For example:
[[Employees: Collection<Text>]]

{{#for each Employee: Employees =>
    ^[[Employee]]
}}
WARNING
- The element variable (
Employeein the example above) needs to be a new variable name. You cannot use an already existing variable name. - Be aware that if you define a new variable in the
for eachblock, that variable will be used for all iterations. A new variable will not be generated for each iteration. - If you need more than one value in your
for eachblock, you will need to use a Structure type.
# Choice
The Choice metatype lets you define a list of options as a type. This is useful if you want to define a type as a list of elements (enum in programming language).
Here is an example of the syntax to define and use a Choice type:
[[Country: Choice("USA", "Switzerland", "Sweden", "Germany", "India")]] //type definition
[[Country of Origin: Country]] //type usage
# options property
If your goal is not to create a type but just to define a list of possible values for a variable, you can use the property options in the type definition.
Here is an example:
[[Country: Text(
    options: "USA", "Switzerland", "Sweden", "Germany", "India"
    )]]
The options property also allows you to define expressions in the list of options and therefore make the options dynamic:
[[Another Country]]

[[Country: Text(
    options: "USA", "Switzerland", "Sweden", "Germany", "India", Another Country
    )]]
The main difference between options and the Choice type is that options is a way to define a subset from a type instead of creating a new type.
If you want the options to have a default value, you can use the property value:
[[Country: Text(
    options: "USA", "Switzerland", "Sweden", "Germany", "India";
    value: "USA"
    )]]
# Structure
The Structure metatype lets you define a list of related variables bundled into one grouping. The following is an example of the syntax to define and use a Structure type:
[[Employee Info: Structure(
    First name: Text;
    Last name: Text;
    Address: Address;
    Ethereum address: EthAddress
    )]] //type definition

[[#Employee: Employee Info]] //type usage

**Employee of the Month**
Name: [[Employee.First name]] [[Employee.Last name]] //field access
City: [[Employee.Address.city]] //field access of a complex type
Ethereum address: [[Employee.Ethereum address]] //field access
A Structure type can also be used with a Collection as shown in the example below. This combination allows you to more efficiently incorporate and organize information entered by the parties into your agreement.
[[Employee Info: Structure(
    First name: Text;
    Last name: Text;
    Address: Address;
    Ethereum address: EthAddress
    )]] //type definition

[[#Employees: Collection<Employee Info>]] //type usage with Collection

**Employees of the Month**
{{#for each Employee: Employees =>
    ^Name: [[Employee.First name]] [[Employee.Last name]] //field access
    ^^City: [[Employee.Address.city]] //field access of a complex type
    ^^Ethereum address: [[Employee.Ethereum address]] //field access
}}
WARNING
When defining any of these specialized types, the name cannot be the same as any variable or specialized type (e.g, Text, Number, Address, Choice, etc.) or an already existing variable name. You can use the shortcut ctrl + space in the editor to see the complete list of variable and specialized types.
# OLInfo
The OLInfo type is used for making general information available to the user within a template, which might be difficult to fetch any other way.
Currently, the OLInfo type has three fields:
id - References the contract ID for the contract linked with a particular iteration of a template.
profileAddress - References the Ethereum Address associated with the user's profile. (You can set this default Ethereum address by selecting "Link MetaMask Account" from the user profile page).
now - References the current date.
Take the example below. Assuming that a) there is a corresponding contract ID 575b1b0e36825f01f3637be141e13a00b96c062fc236c10bac383f8851652550 and b) the user has linked the Ethereum address 0xA51086a07AE92Ae8c29E7CD34421c16fd666595c to the profile, inputting the below:
[[info: OLInfo]]
The contract ID is [[info.id]].
Your address is [[info.profileAddress]] as of [[Current Date: Date(info.now)]].
should output:
The contract ID is 575b1b0e36825f01f3637be141e13a00b96c062fc236c10bac383f8851652550.
Your address is 0xA51086a07AE92Ae8c29E7CD34421c16fd666595c as of September 24, 2020.
If either of the id or profileAddress values is not defined at the time it is to be rendered in the draft or contract, a default value will be filled in.
The OLInfo type will be populated with additional sub-fields in the future.
# External Signature
The ExternalSignature type lets you define a new signature method which uses an external service registered in the OpenLaw platform through the Integration Framework. The following is an example of the syntax to define and use an electronic signature via DocuSign (opens new window) external service:
[[Signatory: ExternalSignature(serviceName:"DocuSign")]]
# Ethereum Call
The EthereumCall type allows you to integrate your agreement with smart contract code running on the Ethereum blockchain. Common use cases include defining the terms of a transaction in the agreement and then automating the transfer of assets (including digital payment) upon execution of the contract. See the Smart Contracts section for details and examples of how to set up an Ethereum Call in your template.
# External Call
The ExternalCall type allows you to define custom calls that should be triggered from OpenLaw VM to an external service. In the following example we define an external call variable.
Considering an external service registered into the OpenLaw Integration Framework which has the following interface:
[[Input: Structure(param1:Text;param2:Text)]]
[[Output: Structure(value1:Text;value2:Text;valueN:Text)]]
We can define the call as follows:
<%
[[a: Text]]
[[b: Text]]
[[startingAt: DateTime]]

[[externalCall:ExternalCall(
serviceName: "MyServiceName";
parameters:
  param1 -> a,
  toCurrency -> b;
startDate: startingAt)]]
%>

{{ externalCall.status = 'success' =>
    [[externalCall.result.value1]]
    [[externalCall.result.value2]]
    [[externalCall.result.valueN]]
}}
WARNING
The externalCall.status returns the current status of the call which can be pending, failed, success.
Besides that, the external call allows you to read the result of the call by accessing the property externalCall.result
which provides access to the attributes declared as Output in interface.
It is important to mention that the output results are not printed out in the contract, but stored as events in Openlaw VM so
they can be used for further calls and computations.
# Formatting
# Bold
To bold text, simply add ** before and after the relevant language. For example, **This Agreement** will bold the relevant text. You can also bold variables, **[[Variable]]**.
# Italic
Italicizing text works in much the same way. If you would like to italicize text, you can simply add * before and after the relevant language. For example, "PartyA agrees to deliver to PartyB 10 widgets; *provided however,* that PartyB will not be required to deliver widgets to Party B ...."
# Bold and Italic
You can also bold and italicize text. For this type of formatting, simply surround the relevant text with ***, in other words ***[[Variable Name]]***.
# Underline
To underline text, just add __ (two underscores) before and after the desired content. For example, __This text is underlined for emphasis__. You can also underline variables, __[[Variable]]__. If you would like to apply multiple formatting styles, just apply the relevant syntax around the text. For example, __**This text is underlined and bold for more emphasis**__.
# Uppercase
We also recognize that in some instances a variable will need to be displayed in all caps, particularly in the context of titles and signature blocks. To accommodate this requirement, you can designate instances when a variable should appear in uppercase by adding the following text after a variable name | Uppercase. In other words, [[Variable Name | Uppercase]].
# Centered
To center text such as titles and headings, add \centered before the relevant text. You can also apply other formatting to the centered language. For example, \centered **Agreement Title** will center and bold the relevant text.
# Right Align
To right align text, add \right before the relevant text. You can also position text to be only three-quarters aligned to the right by adding \right-three-quarters before the relevant text. Similarly to centered text, you can apply other formatting to right or right-three-quarters aligned content. For example, \right-three-quarters **Sign here**.
# Page Break
If you would like to add a page break, such as separating an exhibit from the main body of the agreement, you can simply add \pagebreak where the break should be.
# Sections and Subsections
Organizing an agreement into sections and subsections is straightforward. Currently, we offer four section levels, which can be invoked using the following syntax:
^ - First Level
^^ - Second Level
^^^ - Third Level
^^^^ - Fourth Level
For instance, the following marked-up text would output as in the following video.
^ The Company represents and warrants that:

^^ **Organization**. The Company is a corporation duly organized, validly
existing, and in good standing under the laws of the [[State of Incorporation]],
has corporate power to carry on its business as it is now being conducted, and
is qualified to do business in every jurisdiction in which the character and
location of the assets owned by it or the nature of the business transacted by
it requires qualification or in which failure to so qualify would have a
material adverse impact on it. No proceeding is pending, or to the knowledge of
the Company, threatened, involving the Company, in which it is alleged that the
nature of its business makes qualification necessary in any additional
jurisdiction.

^^ **Authority**. The Company has the full right, power, and authority to enter
into this Agreement and each agreement, document, and instrument to be executed
and delivered by the Company pursuant to this Agreement and to carry out the
transactions contemplated hereby and thereby. No waiver or consent of any person
is required in connection with the execution, delivery, and performance by the
Company of this Agreement and each agreement, document, and instrument to be
executed and delivered by the Company pursuant to this Agreement.
# Restarting Numbering and Cross References
To restart the numbering of a section, simply include the following after the section heading:
^(Variable (numbering:1))
The variable can be used for purposes of establishing cross-references:
^ The Company represents and warrants that:

^^(Organization) **Organization**. The Company is a corporation duly organized, validly
existing, and in good standing under the laws of the [[State of Incorporation]],
has corporate power to carry on its business as it is now being conducted, and
is qualified to do business in every jurisdiction in which the character and
location of the assets owned by it or the nature of the business transacted by
it requires qualification or in which failure to so qualify would have a
material adverse impact on it. No proceeding is pending, or to the knowledge of
the Company, threatened, involving the Company, in which it is alleged that the
nature of its business makes qualification necessary in any additional
jurisdiction.

...

Unless as provided in Section [[Organization]], ...
# Titles
You can show the template title for an agreement by including the following option at the beginning of the document. A template title is hidden by default. Not rendering the template title is useful when generating documents with agreement text that already includes a custom title.
####
show title: true;
####
# Annotations
Sometimes it may be helpful to embed annotations in your template to give context to the user. The annotation is rendered only in preview and doesn't affect the docx or pdf version of the agreement.
There are two types of annotations in the markup language currently: header and note.
The header annotation appears above the rest of the template in the editor and may be used (for example) to provide a description of the template content for the reader. The syntax for a header annotation is as follows:
some provision

'''
This is a header annotation explaining the provision and why it's good to have it here.
'''

some other provision
The note annotation is collapsible in the body of the template. It can be used to add notes throughout to clarify or expand on the content. The syntax for the note annotation is as follows:
some provision

"""
This is a note annotation explaining the provision and why it's good to have it here.
"""

some other provision
# Tables
Tabular data can be easily displayed using tables. A table is defined using pipe characters (|) as column delimiters and dashes (-) to separate the table header from the data rows.
| Heading 1 | Heading 2 | Heading 3 |
| --------- | --------- | --------- |
| Data 1    | Data 2    | Data 3    |
| {{var1}}  | {{var2}}  | {{var3}}  |
Note that the column delimiters do not have to be aligned from row to row, so the following is also a valid table definition.
| H1 | Heading 2 | H3 |
| - | - | - |
| Data 1 | D2 | D3 |
Table cells may contain text content, variables, or conditionals.
# Conditionals and Decision Branches
You can markup an agreement with "conditionals" to embed advanced logic into an agreement, helping you create more dynamic and customizable legal agreements.
# Basic Conditionals
Currently, conditionals create binary "yes" or "no" questions in our form generation application. When a user enters "yes," the conditional will output text, variables, smart contract calls, and/or trigger another conditional. The basic construct of a conditional is as follows:
{{Name of Conditional "Question to Prompt User" =>
Text to include in an agreement if a user selects 'yes'}}
Note there are strict requirements that you must follow when creating a conditional. First, you must start a conditional with {{ and end the conditional with }}. Second, you must name the conditional and include language in quotes that serves as a prompt for the user.
# Nested Conditionals
Conditionals also can be grouped to create a decision tree. In other words:
{{ Name of Conditional "Question to Prompt User" =>
  Text to include in an agreement if a user selects 'yes'
  {{Subconditional 1 "Text of Sub-Question 1" => Text}}
  {{Subconditional 2 "Text of Sub-Question 2" => Text}}
  {{Subconditional 3 "Text of Sub-Question 3" => Text}}
}}
To see this in action, consider the following standard language found at the beginning of a standard mutual NDA:
This Mutual Nondisclosure Agreement (this "Agreement") is made as of [[Effective
Date: Date]], by and  between [[PartyA]] ("[[PartyA Abbreviation]]")
{{PartyAEntity "Is the first party a legal entity?" => {{PartyACorporation
"A Corporation?" =>, a [[PartyAStateOfIncorporation]] corporation, }}{{PartyALLC
"An LLC?" =>a [[PartyAStateOfIncorporation]] limited liability company, }}
{{PartyAPBC "A Public Benefit Corporation?" =>, a [[PartyAStateOfIncorporation]]
public benefit corporation,}}}} and [[PartyB]]{{PartyBEntity "Is the
counterparty a legal entity?"=>{{PartyBCorporation "A Corporation?"=>, a
[[PartyBStateOfIncorporation]] corporation }}{{PartyBLLC "An LLC?" =>, a
[[PartyBStateOfIncorporation]] limited liability company}}{{PartyBPBC "A Public
Benefit Corporation?" =>, a [[PartyBStateOfIncorporation]] public benefit
corporation}}}}("Counterparty").
The text above generates the following "decision tree" in our form generation application:
# Advanced Uses of Conditionals
We understand that oftentimes agreements are complex, and if you include a provision in one part of the agreement, it may impact other provisions. To accommodate this fact, if you create a conditional, you can trigger the inclusion of additional text elsewhere if that conditional is set to "yes" (true) or "no" (not true).
For example, extending the previous example, if we wanted to modify the signature block of an agreement depending on whether or not the agreement is between a legal entity or an individual you can easily do so by simply referencing the name of the conditional.
**[[PartyA | Uppercase]]**

_______________________
{{PartyAEntity => By: [[PartyA Signatory First Name]] [[PartyA Signatory Last Name]]
Title: [[PartyA Signatory Title]]}}
Below shows how this can dynamically change the text:
# Conditionals With Else
It is also possible to create an if/else conditional: a conditional which displays one set of text when the YesNo variable is set to "yes" and a different set of text when it is set to "no". This feature increases the power of conditional statements considerably.
Here is a simple example. Consider the below markup:
This is my clause. [[contractor: Text "the contractor who is going to do the
job"]]. {{shouldShowBirthdate "Should we show the birthdate?" => And I am born
in [[contractorBirthdate "The birthdate of the contractor"]]. :: I am not showing
any birthday-related information.}}
Assuming the contractor variable value is John Doe and the contractorBirthdate variable value is 1980, the above text will display the following if shouldShowBirthdate is set to yes:
This is my clause. John Doe. And I am born in 1980.
In contrast, it will display the following if shouldShowBirthdate is set to no:
This is my clause. John Doe. I am not showing any birthday-related information.
Sections, choices, boolean expressions, and other advanced conditional features described above and below can be included in if-else conditionals just as in regular conditionals.
# Reasoning with Conditionals
# Generally
OpenLaw's markup language can handle boolean expressions, outlined below:
&& - And
|| - Or
! - Not
= - Equal
> - Greater Than
< - Less Than
>= - Greater Than or Equal
<= - Less Than or Equal
When conditionals are combined with the above boolean expressions, the expressive power of the OpenLaw markup language comes into focus. For example, imagine that you wanted to include an additional provision in an agreement--let's say a requirement that the parties obtain insurance--if the total value of the agreement exceeded a certain dollar threshold, you could easily do so as demonstrated below.
[[PartyA]] shall pay [[PartyB]] fee of $[[Total Fees Due Under an Agreement:
Number]].

....

{{Total Fees Due Under an Agreement>20000 => ^**Insurance**.

^^*Mutual Insurance*. Each party shall maintain the types of insurance customary
and appropriate for such agreements, in the amount necessary to cover its
obligations and responsibilities under this agreement or required by Law,
whichever is less.

^^*Proof of Insurance*. On the other party's request, each party shall deliver
to the other party a certificate or other proof of its insurance, describing the
amount and coverage of its insurance.

^^*Notice of Material Change*. If there is any material change to either party's
insurance, that party shall promptly notify the other party.}}
Likewise, in many instances, you may only want to modify the language of an agreement if one or more factual situations are present. Using boolean expressions and conditionals, you'll be able to do so.
[[PartyA]] shall pay [[PartyB]] a fee of $[[Total Fees Due Under an Agreement:
Number]].

{{Total Fees Due Under an Agreement>20000 =>
    {{Insurance "Do you want to include an insurance provision?" =>
        {{Neutral "Do you want the provision to be Neutral?" =>}}
        {{ProProvider "Do you want the provision to be Pro-Provider?" =>}}
    }}
}}

{{(Total Fees Due Under an Agreement>20000&&Neutral) => ^**Insurance**.

^^*Mutual Insurance*. Each party shall maintain the types of insurance customary
and appropriate for such agreements, in the amount necessary to cover its
obligations and responsibilities under this agreement or required by Law,
whichever is less.

^^*Proof of Insurance*. On the other party's request, each party shall deliver
to the other party a certificate or other proof of its insurance, describing the
amount and coverage of its insurance.

^^*Notice of Material Change*. If there is any material change to either party's
insurance, that party shall promptly notify the other party.}}

{{(Total Fees Due Under an Agreement>20000&&ProProvider) => ^**Insurance**.

^^*Insurance Requirement*. [[PartyB]] shall maintain the insurance necessary to
cover its obligations and responsibilities under this agreement, or any amount
required by Law, whichever is less.

^^*Proof of Insurance*. At [[PartyA]]'s request, [[PartyB]] will provide
[[PartyA]] with certificates or other acceptable proof of its insurance,
describing the coverage of its insurance, and notice of any material change to
its insurance.

^^*Additional Insurance*. [[PartyB]] may require [[PartyA]] to obtain a
reasonable amount of additional insurance, by providing [[PartyB]] with good
reason for the additional insurance, and requirements for the additional
insurance.

^^*Additional Insured*. [[PartyA]] Added to [[PartyB]]'s Policy [[PartyB]]
shall, within [[Number of Days: Number]] Business Days' of the Effective Date,
have its insurer add [[PartyA]] as an additional insured to its policy.

^^*Certificate of Insurance*. [[PartyB]] shall have its insurer send a
certificate to [[PartyA]], proving [[PartyA]] has been added to [[PartyB]]'s
policy, and confirming that the insurer will give [[PartyB]] [[Number of
Business Days: Number]] Business Days written notice before any proposed
cancelation, modification, or reduction in coverage of [[PartyB]]'s policy.

^^No Contribution from [[PartyA]]. Any insurance carried by [[PartyA]] will not
be subject to contribution.}}
TIP
Using "groupings" and the tags <% %>, it is possible to hide variables and conditionals. By doing so, the spacing shown in the above video can be removed. We discuss these advanced features of the markup language below.
# Choice Type with Conditionals
You can also combine conditionals and the = operator with a Choice type to include text, variables, smart contract calls, and/or trigger a conditional elsewhere in the agreement depending on the option selected in the Choice.
[[Country: Choice("USA", "Switzerland", "Germany")]]
[[Country of Origin: Country]]

**Country flag colors:**
{{
    {{Country of Origin = "USA" => red, white, and blue}}
    {{Country of Origin = "Switzerland" => red and white}}
    {{Country of Origin = "Germany" => black, red, and gold}}
}}
# Calculations and Aliasing
Using the OpenLaw Markup language, you can also perform basic calculations. Using this functionality, you can output dynamically generated values from other inputs, which can be automatically included in the text of an agreement.
* - Multiplication
+ - Addition
- - Subtraction
/ - Division
@ - Creating an alias
Example
To perform a calculation, you must first create an alias by including an @ before the name of a variable. Once setup, the alias can perform any calculation, including a calculation that is dependent on another variable set to a Number type. For example, as shown below, we can set a variable for a monthly payment and automatically calculate an annual payment.
<%

==Parties==
[[PartyA]]
[[PartyB]]

==Payment==
[[Monthly Payment: Number]]
[[@Annual Payment = Monthly Payment * 12]]

%>

[[PartyA]] shall pay [[PartyB]] $[[Monthly Payment]] monthly, or $[[Annual Payment]]
annually, payable within thirty (30) days of invoice.
WARNING
When using aliases and variables to perform calculations, the alias must be defined before being used in the template. The following will result in an error:
[[PartyA]] shall pay [[PartyB]] $[[Monthly Payment: Number]] monthly, or
$[[Annual Payment]] annually, payable within thirty (30) days of invoice.
[[@Annual Payment = Monthly Payment * 12]]
In addition, a variable must be defined before being used in an alias expression. The following will also result in an error:
[[@Annual Payment = Monthly Payment * 12]]
[[PartyA]] shall pay [[PartyB]] $[[Monthly Payment: Number]] monthly, or
$[[Annual Payment]] annually, payable within thirty (30) days of invoice.
As in the correct example above, using "groupings" and the tags <% %> to define aliases and variables will make it easier to correctly perform calculations. We discuss these advanced features of the markup language below.
The same logic can be applied to extend the insurance example outlined above:
<%

==Parties==
[[PartyA]]
[[PartyB]]

==Payment==
[[Monthly Payment: Number]]
[[@Annual Payment = Monthly Payment * 12]]

==Insurance Provision==
[[Insurance]]
[[Neutral]]
[[ProProvider]]
[[Number of Days: Number]]
[[Number of Business Days: Number]]

%>

[[PartyA]] shall pay [[PartyB]] $[[Monthly Payment]] monthly, or $[[Annual Payment]]
annually, payable within thirty (30) days of invoice.

{{Annual Payment > 20000 =>
    {{Insurance "Do you want to include an insurance provision?" =>
        {{Neutral "Do you wan the provision to be Neutral?" =>}}
        {{ProProvider "Do you want the provision to be Pro-Provider?" =>}}
    }}
}}

{{(Annual Payment > 20000 && Neutral) => ^**Insurance**.

^^*Mutual Insurance*. Each party shall maintain the types of insurance customary
and appropriate for such agreements, in the amount necessary to cover its
obligations and responsibilities under this agreement or required by Law,
whichever is less.^^*Proof of Insurance*. On the other party's request, each
party shall deliver to the other party a certificate or other proof of its
insurance, describing the amount and coverage of its insurance.

^^*Notice of Material Change*. If there is any material change to either party's
insurance, that party shall promptly notify the other party.

}}

{{(Annual Payment > 20000 && ProProvider) => ^**Insurance**.

^^*Insurance Requirement*. [[PartyB]] shall maintain the insurance necessary to
cover its obligations and responsibilities under this agreement, or any amount
required by Law, whichever is less.

^^*Proof of Insurance*. At [[PartyA]]'s request, [[PartyB]] will provide
[[PartyA]] with certificates or other acceptable proof of its insurance,
describing the coverage of its insurance, and notice of any material change to
its insurance.

^^*Additional Insurance*. [[PartyB]] may require [[PartyA]] to obtain a
reasonable amount of additional insurance, by providing [[PartyB]] with good
reason for the additional insurance, and requirements for the additional
insurance.

^^*Additional Insured*. [[PartyA]] Added to [[PartyB]]'s Policy [[PartyB]]
shall, within [[Number of Days]] Business Days' of the Effective Date, have its
insurer add [[PartyA]] as an additional insured to its policy.^^*Certificate of
Insurance*. [[PartyB]] shall have its insurer send a certificate to [[PartyA]],
proving [[PartyA]] has been added to [[PartyB]]'s policy, and confirming that
the insurer will give [[PartyB]] [[Number of Business Days]] Business Days
written notice before any proposed cancelation, modification, or reduction in
coverage of [[PartyB]]'s policy.

^^No Contribution from [[PartyA]]. Any insurance carried by [[PartyA]] will not
be subject to contribution.

}}
TIP
See the note above about the spacing in the above video.
# Hidden Variables
You can also hide a variable if needed to perform basic calculations. To hide a variable, just add a # before the variable name: [[#Variable]]. Each hidden variable is displayed to an end user, but is not displayed within the text of the template or agreement.
# Calculating Date and Time Periods
You can also use aliases together with Period type variables and Date and DateTime type variables to calculate past and future dates and times.
<%

[[Effective Date: Date]]
[[Time Period 1: Period]]

%>

[[@Past Date = Effective Date - Time Period 1]]
Past Date: [[Past Date]]

[[@Future Date = Effective Date + Time Period 1]]
Future Date: [[Future Date]]

<%

[[Effective Time: DateTime]]
[[Time Period 2: Period]]

%>

[[@Past Time = Effective Time - Time Period 2]]
Past Time: [[Past Time]]

[[@Future Time = Effective Time + Time Period 2]]
Future Time: [[Future Time]]
Constants can also be used with aliases and Date and DateTime type variables to calculate future dates and times:
[[Effective Time: DateTime]]
[[@Future Time = Effective Time + "1 day 12 hours 30 minutes 15 seconds"]]
# Advanced Uses of Conditionals with Calculations and Aliasing
The features of conditionals with boolean expressions can be combined with calculations and aliasing to help you create even more dynamic and customizable legal agreements where the assignment of a variable may depend on different calculations and other variables within the agreement. As shown in the example below taken from our Federal Employment Tax Demo (opens new window), you can use all these concepts together to create advanced logic decision trees that resemble "if else" or "switch case" statements in common programming languages.
^**Federal Income Tax Withholding (using the Percentage method).**

The amount of federal income tax that must be withheld from the Employee's
weekly wages is based on the Weekly Wages Subject to Income Tax Withholdings and
the Employee's filing status. The Employee is electing to withhold at the
{{Single Status "Employee's Filing status: 'Single'?" => Single rate}}{{Married
Status "'Married'?" => Married rate}}{{Married Filing Separate Status "'Married,
but withhold at higher Single rate'?" => Married, but higher Single rate}}.

{{Single Status || Married Filing Separate Status || !Married Status =>
    {{
        {{Weekly Wages Subject to Federal Withholdings <= 71 => [[@Amount of
        Income Tax Withheld = 0]]}}
        {{(Weekly Wages Subject to Federal Withholdings > 71) && (Weekly Wages
        Subject to Federal Withholdings <= 254) => [[@Amount of Income Tax
        Withheld = (Weekly Wages Subject to Federal Withholdings - 71) * 0.10]]}}
        {{(Weekly Wages Subject to Federal Withholdings > 254) && (Weekly Wages
        Subject to Federal Withholdings <= 815) => [[@Amount of Income Tax
        Withheld = (Weekly Wages Subject to Federal Withholdings - 254) * 0.12 +
        18.30]]}}
        {{(Weekly Wages Subject to Federal Withholdings > 815) && (Weekly Wages
        Subject to Federal Withholdings <= 1658) => [[@Amount of Income Tax
        Withheld = (Weekly Wages Subject to Federal Withholdings - 815) * 0.22 +
        85.62]]}}
        {{(Weekly Wages Subject to Federal Withholdings > 1658) && (Weekly Wages
        Subject to Federal Withholdings <= 3100) => [[@Amount of Income Tax
        Withheld = (Weekly Wages Subject to Federal Withholdings - 1658) * 0.24
        + 271.08]]}}
        {{(Weekly Wages Subject to Federal Withholdings > 3100) && (Weekly Wages
        Subject to Federal Withholdings <= 3917) => [[@Amount of Income Tax
        Withheld = (Weekly Wages Subject to Federal Withholdings - 3100) * 0.32
        + 617.16]]}}
        {{(Weekly Wages Subject to Federal Withholdings > 3917) && (Weekly Wages
        Subject to Federal Withholdings <= 9687) => [[@Amount of Income Tax
        Withheld = (Weekly Wages Subject to Federal Withholdings - 3917) * 0.35
        + 878.60]]}}
        {{Weekly Wages Subject to Federal Withholdings > 9687 => [[@Amount of
        Income Tax Withheld = (Weekly Wages Subject to Federal Withholdings -
        9687) * 0.37 + 2898.10]]}}
    }}
}}

The amount of federal income tax that must be withheld from the Employee's
weekly wages is **$[[Amount of Income Tax Withheld]]**.
# Inline Calculations
In addition to using aliases for calculations, you can use shorthand inline expressions. This may be ideal for simpler calculations. As with the case of calculating with aliases, a variables must be defined before being used in an expression to calculate a value.
<%

[[price: Number]]
[[discount: Number]]

%>

The price with a discount of [[discount]]% is $[[price - (price * (discount / 100))]].
# Clauses
The Clause type in OpenLaw is equivalent to an embedded template. It can be used to insert pre-formed clauses, such as commonly used legal provisions (boilerplate)—whether simple or complex—into existing templates. The clause to be embedded in a template is technically a saved template itself and can include variables. When the clause is embedded in a template, those variables will render as part of the agreement text and have their own form fields as if they were directly included in that template's markup language.
For example, assuming you have created a new template called Choice of Law and Venue Clause with the following content:
**Choice of Law and Venue.** The parties agree that this Agreement is to be
governed by and construed under the law of the State of [[State of Governing Law]]
without regard to its conflicts of law provisions. The parties further agree
that all disputes shall be resolved exclusively in state or federal court in
[[County of Venue]], [[State of Venue]].
You can import it in any other template by referencing a named variable of Clause type with the title of the saved template you wish to import. For example:
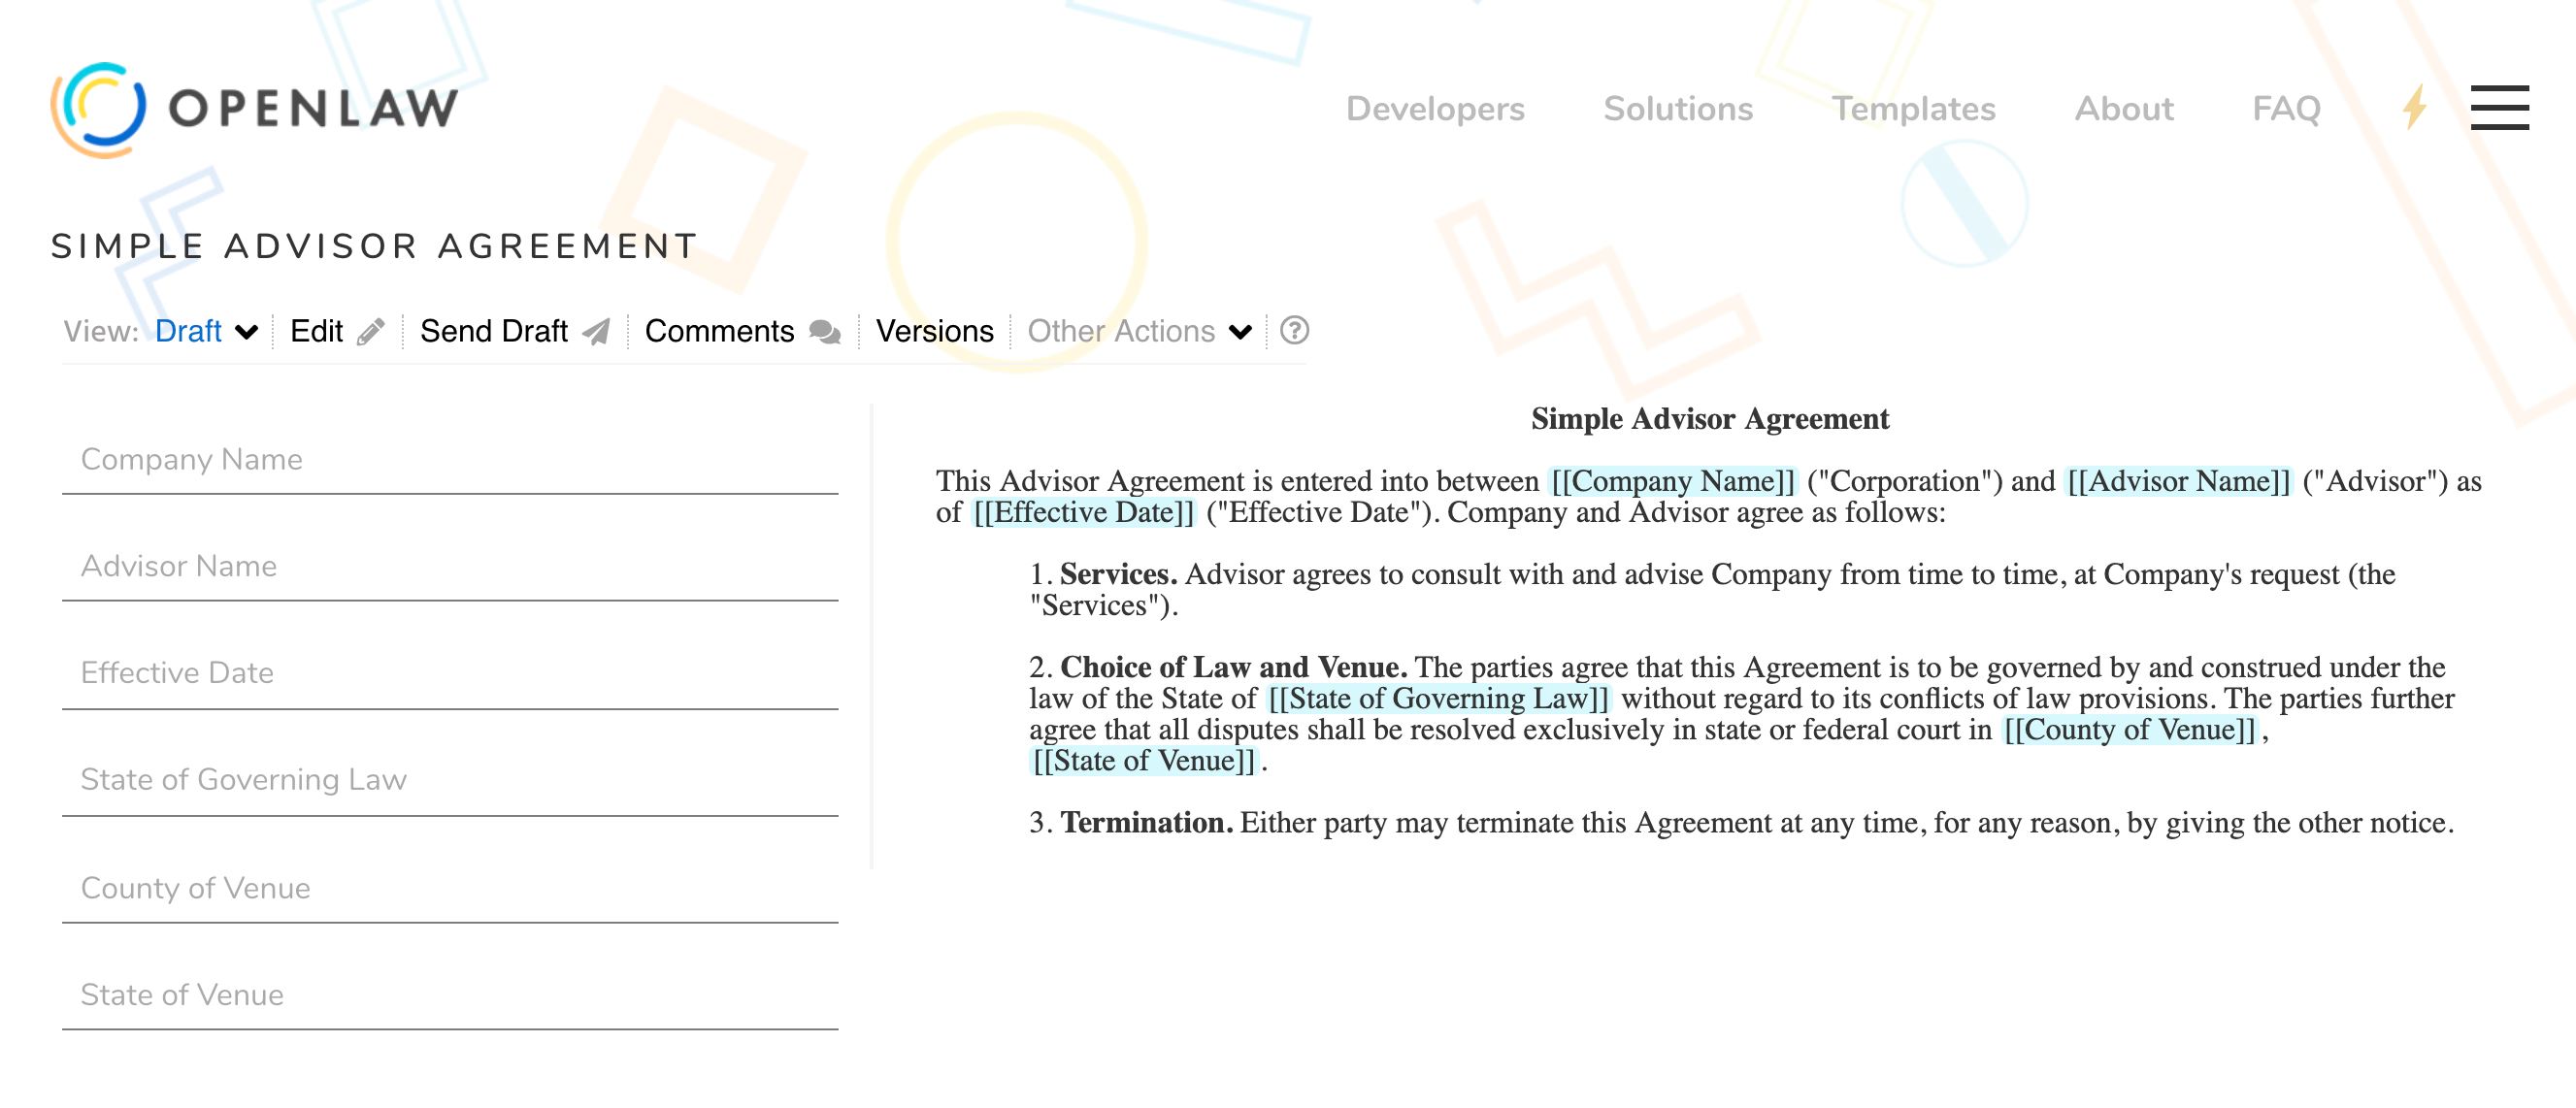
\centered **Simple Advisor Agreement**

This Advisor Agreement is entered into between [[Company Name]] ("Corporation")
and [[Advisor Name]] ("Advisor") as of [[Effective Date: Date]] ("Effective Date").
Company and Advisor agree as follows:

^**Services.** Advisor agrees to consult with and advise Company from time to time,
at Company's request (the "Services").

^[[Choice of Law Insert: Clause("Choice of Law and Venue Clause")]]

^**Termination.** Either party may terminate this Agreement at any time, for any
reason, by giving the other notice.
WARNING
Note that since a Clause is a type of template, you must save that template separately before you try to embed it in another template, or else you will receive an error similar to below:
The template Choice of Law and Venue Clause could not be found on the server
The example markup above will render the Draft view below. Note how the variables included in the embedded clause (the Choice of Law and Venue Clause template) are included as form fields in the Simple Advisor Agreement template.
# Defining a Clause Type Variable
When embedding a Clause type, you must give the variable a name as in the example above (Choice of Law Insert). Each clause embedded in a template should be defined with a name unique from any other variable defined in the template.
The name of the variable can be useful to embed the clause more than once in the same template. For example, if you have already defined the clause in the template with [[Choice of Law Insert: Clause("Choice of Law and Venue Clause")]], you can render the same clause again in the template by just referencing [[Choice of Law Insert]].
A named Clause type variable can also be useful when rendering the clause as part of a conditional. For example:
{{Name of Conditional "Do you want to render the clause" => [[Choice of Law Insert]]}}
# Identity and Signatures
OpenLaw also provides tools that enable you to electronically sign an agreement and store those electronic signatures on the Ethereum blockchain. If you intend to build a template to leverage this functionality, you will need to include a specialized Identity variable in the text of the template. The Identity variable indicates that a party should sign the agreement and will enable you to send an email notification to the party to review and sign the agreement.
# Basic Identity
To create an Identity variable for signature, all you need to do is add : Identity after a variable name: [[Signatory Email: Identity]].
**[[PartyA | Uppercase]]**

[[PartyA Signatory Email: Identity]]
_______________________
{{PartyAEntity => By: [[PartyA Signatory First Name]] [[PartyA Signatory Last Name]]
Title: [[PartyA Signatory Title]]}}

**COUNTERPARTY**

[[PartyB Signatory Email: Identity]]
_______________________
{{PartyBEntity => By: [[PartyB Signatory First Name]] [[PartyB Signatory Last Name]]
Title: [[PartyB Signatory Title]]}}
Once a user indicates that the template is ready for signature, OpenLaw will generate a window, where a user can input the signatories' emails and send out the agreement for signature.
# Embedding Signatures
You can also embed a signature into the document by adding | Signature at the end of an Identity variable. For example, extending the above example:
**[[PartyA | Uppercase]]**

[[PartyA Signatory Email: Identity | Signature]]
_______________________
{{PartyAEntity => By: [[PartyA Signatory First Name]] [[PartyA Signatory Last Name]]
Title: [[PartyA Signatory Title]]}}

**COUNTERPARTY**

[[PartyB Signatory Email: Identity | Signature]]
_______________________
{{PartyBEntity => By: [[PartyB Signatory First Name]] [[PartyB Signatory Last Name]]
Title: [[PartyB Signatory Title]]}}
By deploying this option, the final executed version of an agreement (and the word version) will be embedded with an electronic signature from each signatory. In other words, "/s" plus the name of the signatory associated with the OpenLaw account.
# External Signatures
You can use third-party signature services from OpenLaw agreements by declaring a new variable type. Checkout the External Signature Call example for more details.
# Groupings
For complex agreements with multiple variables and conditionals, you can create "groupings" to organize a template's variables and conditionals. The variables and conditionals will appear below a header and in the order in which they are listed. The basic syntax of a grouping is as follows:
<%

==Name of Grouping==
[[Variable 1]]
[[Variable 2]]
[[Variable 3]]

%>
WARNING
Do not place two variables names on the same line. The second variable will not render.
For example, you could organize information from both of the parties using groupings.
<%

==Company==
[[Company Name]]
[[Company Address: Address]]

==Company Signatory==
[[Company Signatory First Name]]
[[Company Signatory Last Name]]
[[Company Signatory Title]]

==Vendor==
[[Vendor Name]]
[[Vendor Address: Address]]

==Vendor Signatory==
[[Vendor Signatory First Name]]
[[Vendor Signatory Last Name]]
[[Vendor Signatory Title]]

%>

[[Company Name | Uppercase]]

___________________________
[[Company Signatory First Name]] [[Company Signatory Last Name]]
Title:  [[Company Signatory Title]]
Address:
[[#Company Address: Address]][[Company Address.streetNumber]] [[Company Address.streetName]]
[[Company Address.city]], [[Company Address.state]] [[Company Address.zipCode]]

[[Vendor Name | Uppercase]]

___________________________
[[Vendor Signatory First Name]] [[Vendor Signatory Last Name]]
Title:  [[Vendor Signatory Title]]
Address:
[[#Vendor Address: Address]][[Vendor Address.streetNumber]] [[Vendor Address.streetName]]
[[Vendor Address.city]], [[Vendor Address.state]] [[Vendor Address.zipCode]]
You can also include references to conditionals in a grouping. An example of this functionality is shown below.
<%

==Company==
[[Company Name]]
[[Company Address: Address]]

==Company Signatory==
[[Company Signatory First Name]]
[[Company Signatory Last Name]]
[[Company Signatory Title]]

==Vendor==
[[Vendor Name]]
[[Vendor Address: Address]]

==Vendor Signatory==
[[VendorEntity]]
[[Vendor Signatory First Name]]
[[Vendor Signatory Last Name]]
[[Vendor Signatory Title]]

%>

[[Company Name | Uppercase]]

___________________________
[[Company Signatory First Name]] [[Company Signatory Last Name]]
Title:  [[Company Signatory Title]]
Address:
[[#Company Address: Address]][[Company Address.streetNumber]] [[Company Address.streetName]]
[[Company Address.city]], [[Company Address.state]] [[Company Address.zipCode]]

{{VendorEntity "Is the vendor a legal entity?" => [[Vendor Name | Uppercase]]}}
{{!VendorEntity => VENDOR}}

___________________________
{{VendorEntity => [[Vendor Signatory First Name]] [[Vendor Signatory Last Name]]
Title:  [[Vendor Signatory Title]]}}{{!VendorEntity => [[Vendor Name]]}}
Address:
[[#Vendor Address: Address]][[Vendor Address.streetNumber]] [[Vendor Address.streetName]]
[[Vendor Address.city]], [[Vendor Address.state]] [[Vendor Address.zipCode]]
# Deals
Using OpenLaw, you can link together multiple templates into what we call a "deal." A deal is simply a collection of templates. To create a deal, you need to call a template. You can do so using the following syntax:
[[Variable Name: Template("Template Name")]]
When you create a deal and call one or more templates, you'll have the opportunity to collect relevant information on an opening screen, which can be pre-populated in multiple templates at the same time.
# Basic Deal
To illustrate, assume that you create two highly simplified templates:
Consulting Agreement
This Consulting Agreement (the "Agreement") is made as of [[Effective Date: Date]]
by and between [[Party A]] ("Client") and the [[Party B]] ("Consultant").

^ **Engagement of Services**. Client may issue Project Assignments to Consultant
in the form attached to this Agreement as Exhibit A ("Project Assignment").
Subject to the terms of this Agreement, Consultant will render the services set
forth in Project Assignment(s) accepted by Consultant (the "Services") by the
completion dates set forth therein.

^**Compensation**.  Client will pay Consultant the fee set forth in each Project
Assignment for Services rendered pursuant to this Agreement as Consultant’s sole
compensation for such Services.


**CLIENT**

[[Party A Signatory Email: Identity]]
_______________________
[[Party A Signatory First Name]] [[Party A Signatory Last Name]]

**CONSULTANT**

[[Party B Signatory Email: Identity]]
_______________________
[[Party B Signatory First Name]] [[Party B Signatory Last Name]]
Project Assignment
**Project Assignment [[Project Assignment Number]] Under Consulting Agreement**
Dated: [[Effective Date: Date]]

This Project Assignment ("Project Assignment"), adopts and incorporates by
reference the terms and conditions of the Consulting Agreement (the
"Agreement"), entered into on [[Effective Date: Date]], [[Party A]] ("Client")
and [[Party B]] ("Consultant").  Services performed under this Project
Assignment will be conducted in accordance with and be subject to the terms and
conditions of this Project Assignment, the Agreement.  Capitalized terms used
but not defined in this Project Assignment shall have the meanings set out in
the Agreement.

**Project:** [[Describe Project]]

**Schedule Of Work:** [[Describe Schedule of Work]]

**Fees:** For services provided, Client shall pay Consultant [[Describe Fees]]
upon completion of the Project.  Fees shall not be paid until the work performed
pursuant to this Project Assignment has been approved by the Client, which will
not be unreasonably withheld.


**CLIENT**

[[Party A Signatory Email: Identity]]
_______________________
[[Party A Signatory First Name]] [[Party A Signatory Last Name]]

**CONSULTANT**

[[Party B Signatory Email: Identity]]
_______________________
[[Party B Signatory First Name]] [[Party B Signatory Last Name]]
You can combine these two documents into a deal by simply creating the following template:
Consulting Onboarding
<%

==Effective Date==
[[Effective Date: Date]]

==Client==
[[Party A]]
[[Party A Signatory First Name]]
[[Party A Signatory Last Name]]

==Consultant==
[[Party B]]
[[Party B Signatory First Name]]
[[Party B Signatory Last Name]]

==Project Assignment==
[[Project Assignment Number]]
[[Describe Fees]]
[[Describe Project]]
[[Describe Schedule of Work]]

%>

[[Consulting Agreement: Template("Consulting Agreement")]]
[[Project Assignment: Template("Project Assignment")]]
The above will generate an opening page of common variables shared by these templates. Once these variables are filled in, both agreements can be executed as shown in the below video:
WARNING
- The opening page of a deal will not render properly unless you set one or more variables in a grouping.
- Any variable included in a grouping, which is not found in an underlying template will not render.
# Advanced Deals Using Conditionals
Deals can also be set up to handle conditionals present in multiple agreements. Assume for the sake of illustration that the two agreements were modified to include a conditional outlining that the consultant will be paid in ether.
Consulting Agreement
This Consulting Agreement (the "Agreement") is made as of [[Effective Date: Date]]
by and between [[Party A]] ("Client") and the [[Party B]] ("Consultant").

^ **Engagement of Services**. Client may issue Project Assignments to Consultant
in the form attached to this Agreement as Exhibit A ("Project Assignment").
Subject to the terms of this Agreement, Consultant will render the services set
forth in Project Assignment(s) accepted by Consultant (the "Services") by the
completion dates set forth therein.

^**Compensation**.  Client will pay Consultant the fee set forth in each Project
Assignment for Services rendered pursuant to this Agreement as Consultant’s sole
compensation for such Services.  {{Payment in Ether "Will you pay the consultant
in ether?" => Payment shall be made in ether.}}


**CLIENT**

[[Party A Signatory Email: Identity]]
_______________________
[[Party A Signatory First Name]] [[Party A Signatory Last Name]]

**CONSULTANT**

[[Party B Signatory Email: Identity]]
_______________________
[[Party B Signatory First Name]] [[Party B Signatory Last Name]]
Project Assignment
**Project Assignment [[Project Assignment Number]] Under Consulting Agreement**
Dated: [[Effective Date: Date]]

This Project Assignment ("Project Assignment"), adopts and incorporates by
reference the terms and conditions of the Consulting Agreement (the
"Agreement"), entered into on [[Effective Date: Date]], [[Party A]] ("Client")
and [[Party B]] ("Consultant").  Services performed under this Project
Assignment will be conducted in accordance with and be subject to the terms and
conditions of this Project Assignment, the Agreement.  Capitalized terms used
but not defined in this Project Assignment shall have the meanings set out in
the Agreement.

**Project:** [[Describe Project]]

**Schedule Of Work:** [[Describe Schedule of Work]]

**Fees:** For services provided, Client shall pay Consultant [[Describe Fees]]
upon completion of the Project.  Fees shall not be paid until the work performed
pursuant to this Project Assignment has been approved by the Client, which will
not be unreasonably withheld.  {{Payment in Ether "Will you pay the consultant
in ether?" => Payment shall be made in ether to the Consultant Ethereum address
found at [[Recipient Address]]}}.

**CLIENT**

[[Party A Signatory Email: Identity]]
_______________________
[[Party A Signatory First Name]] [[Party A Signatory Last Name]]

**CONSULTANT**

[[Party B Signatory Email: Identity]]
_______________________
[[Party B Signatory First Name]] [[Party B Signatory Last Name]]
Consulting Onboarding
<%

==Effective Date==
[[Effective Date: Date]]

==Client==
[[Party A]]
[[Party A Signatory First Name]]
[[Party A Signatory Last Name]]

==Consultant==
[[Party B]]
[[Party B Signatory First Name]]
[[Party B Signatory Last Name]]

==Project Assignment==
[[Project Assignment Number]]
[[Describe Fees]]
[[Describe Project]]
[[Describe Schedule of Work]]
[[Payment in Ether]]
[[Recipient Address]]

%>

[[Consulting Agreement: Template("Consulting Agreement")]]
[[Project Assignment: Template("Project Assignment")]]
{{Payment in Ether "Will you pay the consultant in ether?" => [[Recipient Address]]}}
On the opening page of the deal, the user will be presented with the conditional. Depending on the answer, the user will be prompted with an additional variable and the text of the underlying agreements will be modified.
# Using Collections and Paths in a Deal
The Collection type used in conjunction with a deal makes it possible to generate a set of agreements for each item added to a Collection. This can be especially useful when the need arises in a deal to create a contract using the same agreement template but with a unique set of input values for each party identified in a Collection type.
Here is a basic example of using a Collection (of a Structure type) in a deal:
<%

==Effective Date==
[[Effective Date: Date]]

==Company==
[[Company Name]]
[[Company Address: Address]]
[[Company Signatory Name]]
[[Company Signatory Position]]
[[Company Signatory Email: Identity]]

==Employees==
[[Employee Info: Structure(
  First name: Text;
  Last name: Text;
  Address: Address;
  Position: Text;
  Ethereum address: EthAddress;
  Email: Identity
  )]]
[[Employees: Collection<Employee Info>]]

%>

# Employment Agreement for each individual Employee
{{#for each Employee: Employees =>
  [[_: Template(
    name: "Employment Agreement";
    parameters:
      Employee Name -> (Employee.First name + " " + Employee.Last name),
      Employee Address -> Employee.Address,
      Employee Position -> Employee.Position,
      Recipient Ethereum Address -> Employee.Ethereum address,
      Employee Signatory Email -> Employee.Email;
    path: "agreements" / (Employee.First name + " " + Employee.Last name)
    )]]
}}
Let's step through what is going on with the Collection in this example.
- First, we define a new Structure type,
Employee Info, bundling all the relevant info for an employee:
[[Employee Info: Structure(
  First name: Text;
  Last name: Text;
  Address: Address;
  Position: Text;
  Ethereum address: EthAddress;
  Email: Identity
  )]]
- Then we define a new Collection type of Employee Info,
Employees:
[[Employees: Collection<Employee Info>]]
- For each element in the Collection (an individual
Employee), we want to generate anEmployment Agreementtemplate. We set the template name as_because it does not need to be defined and we can make the variable name anonymous.
{{#for each Employee: Employees =>
  [[_: Template(
    name: "Employment Agreement";
WARNING
Two or more template variables using the name _ will not cause an error. However, never use an anonymous variable for input variables such as Text, Number, or Address because this will result in an error.
- We then link the parameters in the
Employment Agreementtemplate with the associated parameters for an individualEmployeein the deal template. This makes it possible to generate agreements based on the same template but with different input values. Each of the variablesEmployee Name,Employee Address,Employee Position,Recipient Ethereum Address, andEmployee Signatory Emailneeds to be defined in theEmployment Agreementtemplate and of the same variable type as the parameter it has been linked with from the deal template.
parameters:
  Employee Name -> (Employee.First name + " " + Employee.Last name),
  Employee Address -> Employee.Address,
  Employee Position -> Employee.Position,
  Recipient Ethereum Address -> Employee.Ethereum address,
  Employee Signatory Email -> Employee.Email;
- Finally, the
pathparameter has 2 purposes: (1) it gives a unique name to each agreement based on the parameters and (2) it defines the path that will be used if you download the agreements in the deal.
path: "agreements" / (Employee.First name + " " + Employee.Last name)
# Other Tags
In order to draft readable markup language, the markup language contains several additional tags, which allows users to add comments in code blocks and hide variables from the underlying text. The syntax for these tags can be found below:
# - add a comment (within a code block)
<% %> - opening and closing tags for code blocks (e.g., use with "groupings," smart contract calls, and to hide variables and conditionals)
# Smart Contracts
Using OpenLaw, you can embed and execute smart contract code running on the Ethereum blockchain. In order to do so, you need to create a smart contract call, which can be embedded in a template and executed when all of the relevant parties sign the agreement. An example smart contract call is included below.
As outlined below, the smart contract contains a function "makePayment." The OpenLaw agreement calls the smart contract found at the following Ethereum address 0xe532d1d1147ab40d0a245283f4457c733b5e3d41 (opens new window), (currently on the Rinkeby testnet) which facilitates the payment of ether at fixed intervals. The function accepts several arguments, including "Recipient Addresss", and "Payment in Wei" (wei, is the smallest unit of ether, the native currency of the Ethereum network), along with "Payment Start Date" and "Payment End Date." As part of the call, you can set how often OpenLaw sends the smart contract a message to execute its "makePayment" function within the period defined by the "Payment Start Date" and "Payment End Date." The frequency can be set in seconds, minutes, hours, days, weeks, months, and years (e.g., 30 seconds, 1 minute, 5 hours, 7 days, 2 weeks, 6 months, 1 year). You can also mix time units when setting the frequency (e.g., 2 minutes 30 seconds, 1 week 3 days).
The smart contract can be called as part of a simple or complex agreement. For the sake of illustration, we demonstrate below how it could be included in a fairly simple agreement.
<%

#Smart Contract to Pay Employee
[[@Payment in Wei = Payment in Ether * 1000000000000000000]]

[[Pay Vendor:EthereumCall(
contract:"0xe532d1d1147ab40d0a245283f4457c733b5e3d41";
interface:[{"name":"makePayment", "type":"function","inputs":
[{"name":"RecipientAddress", "type":"address"},
{"type":"uint","name":"PaymentInWei"}],"outputs": []}];
function:"makePayment";
arguments:Recipient Ethereum Address,Payment in Wei;
startDate:Payment Start Date;
endDate:Payment End Date;
repeatEvery:"1 minute")]]

%>

This agreement is entered into by [[Party A]] and [[Party B]] on [[Effective Date: Date]].

**WHEREAS**, [[Party B]] seeks [[Party A]]'s programming services; and

**WHEREAS**, [[Party A]] seeks to be paid in ether;

**NOW, THEREFORE**, in consideration of the premises and the mutual covenants
set forth herein and for other good and valuable consideration, the receipt and
sufficiency of which are hereby acknowledged, the parties hereto covenant and
agree as follows:

^ [[Party A]] agrees to pay [[Party B]] [[Payment in Ether: Number]] ether,
every minute, starting on [[Payment Start Date: DateTime]] and ending on
[[Payment End Date: DateTime]] for programming services.

^ Payment will be paid to [[Party B]]'s ethereum address located at
[[Recipient Ethereum Address: EthAddress]], using the Ethereum smart contract
found at "0xe532d1d1147ab40d0a245283f4457c733b5e3d41," which is incorporated by
reference herein.

[[Pay Vendor]]

**[[Party A | Uppercase]]**

[[Party A Email: Identity | Signature]]
_________________________
(signature)

**[[Party B | Uppercase]]**

[[Party B Email: Identity | Signature]]
_________________________
(signature)
Once the agreement is signed, the smart contract will execute as shown in the video below. OpenLaw sends the smart contract a message to trigger its execution and pass along the relevant values.
The solidity code for the smart contract found at 0xe532d1d1147ab40d0a245283f4457c733b5e3d41 (opens new window) is as follows:
pragma solidity ^0.4.10;

contract salary {

    address owner;

    modifier ownerOnly {
        if(owner != msg.sender) throw;
        _;
    }

    function salary() {
        owner = msg.sender;
    }

    function makePayment(address target, uint amountInWei) ownerOnly {
        target.transfer(amountInWei);
    }

    function() payable {}
}
There are several things to note in the example agreement above.
- The smart contract must first be set as below:
#Smart Contract to Pay Employee
[[@Payment in Wei = Payment in Ether * 1000000000000000000]]

[[Pay Vendor:EthereumCall(
contract:"0xe532d1d1147ab40d0a245283f4457c733b5e3d41";
interface:[{"name":"makePayment", "type":"function","inputs":
[{"name":"RecipientAddress", "type":"address"},
{"type":"uint","name":"PaymentInWei"}],"outputs": []}];
function:"makePayment";
arguments:Recipient Ethereum Address,Payment in Wei;
startDate:Payment Start Date;
endDate:Payment End Date;
repeatEvery:"1 minute")]]
and then separately called:
[[Pay Vendor]]
- The interface for the smart contract is needed for the smart contract application binary interface ("ABI") and can be generated from the solidity compiler. The ABI is basically how you call functions in a smart contract and get data back.
WARNING
- The smart contract will not be executed unless there are one or more Identities (or signatories set for the agreement).
- If the template does not set the appropriate arguments or if the values of those arguments do not align with the underlying smart contract, the smart contract will not execute.
# Selecting the Contract Level Ethereum Network
As an option for embedding a smart contract to execute as part of an agreement, you can select the Ethereum network used for the smart contract executions by specifying the network with "Mainnet", "Ropsten", "Kovan", or "Rinkeby" as shown below.
[[Pay Vendor:EthereumCall(
contract:"0xe532d1d1147ab40d0a245283f4457c733b5e3d41";
interface:[{"name":"makePayment", "type":"function","inputs":
[{"name":"RecipientAddress", "type":"address"},
{"type":"uint","name":"PaymentInWei"}],"outputs": []}];
network:"Rinkeby";
function:"makePayment";
arguments:Recipient Ethereum Address,Payment in Wei;
startDate:Payment Start Date;
endDate:Payment End Date;
repeatEvery:"1 minute")]]
The contract level network set in the EthereumCall is specific to only the smart contract executions for that particular agreement. A signature transaction which occurs after an agreement is signed on an OpenLaw instance will use the application level network set by an Admin user for that instance. So it is possible to use one network for signing an agreement and another network for executing any smart contract transactions as part of that same agreement.
TIP
If you omit the contract level network parameter and value from the EthereumCall, the network used for the smart contract executions will default to the application level network set at the time the executions are initiated.
# Delegating the Call
If you don't want OpenLaw to handle the smart contract call (by default, the Ethereum address initiating the call to the smart contract is an OpenLaw account), you can delegate the call to another Ethereum address, such as one owned by a contract signatory. To do that, all you need is to specify in the from property which address you're expecting to handle the call.
For example:
[[Pay Vendor:EthereumCall(
contract:"0xe532d1d1147ab40d0a245283f4457c733b5e3d41";
interface:[{"name":"makePayment", "type":"function","inputs":
[{"name":"RecipientAddress", "type":"address"},
{"type":"uint","name":"PaymentInWei"}],"outputs": []}];
network:"Rinkeby";
from:"0xe65849d1147ab40d0a245283f4457c733b5e3d41";
function:"makePayment";
arguments:Recipient Ethereum Address,Payment in Wei;
startDate:Payment Start Date;
endDate:Payment End Date;
value: 1000000000000000000;
repeatEvery:"1 minute")]]
If you include the from property with a valid Ethereum address, the default OpenLaw account won't initiate the call. Instead, the OpenLaw smart contract execution process will expect a transaction hash. Like when you sign with MetaMask, an API call will be made to register the transaction hash that has been added to the chain so OpenLaw can know what is going on with the call.
If the smart contract function being called is "payable" and expects to receive funds, the Ethereum call definition should also include a value property with the amount in wei to be sent as part of the transaction.
# Summary of EthereumCall Definition Properties
contract - Ethereum address of the smart contract
interface - ABI for the smart contract in JSON format
function - specific function to execute in smart contract
arguments - list of values sent to the function
startDate - when the function should be executed for the first time (optional - default is to execute immediately after the contract has been electronically signed by all parties)
repeatEvery - how often the function should be executed (optional - default is to execute only once)
endDate - for a function that is executed periodically, when the function should be executed for the last time (optional - default is no end date/time)
network - the Ethereum network used for the smart contract execution (optional - see above for more details on selecting a network)
from - Ethereum address of user that will initiate the function call (for use in a delegated call)
value - Amount in wei sent as part of executing a payable smart contract function (for use in a delegated call)
# EthereumCall Usage Properties
The EthereumCall type also gives you access to some properties you can use in an agreement template. Those properties are only resolved once the first call is completed (and works only on the first call for now).
isSuccessful - Returns true if the call has been successful, false otherwise.
isFailure - Returns true if the call has failed, false otherwise.
executionDate - Returns DateTime of when the call has been triggered. It doesn't resolve if the call hasn't executed yet.
tx - Returns the Ethereum transaction hash of the call. It doesn't resolve if the call hasn't executed yet.
# EthereumEventFilter
The EthereumEventFilter type is used to register an event listener that responds to events generated from a particular Ethereum contract. A conditional expression may be used to filter out unwanted events and select only events of interest. The first event that is matched by this filter may then be referenced in the agreement or used in other expressions by referencing the filter variable.
The conditional filter may use any of the event fields that are defined in the ABI provided in the filter definition as well as other variables in the agreement.
A simple example of listening for filtering events of an Ethereum contract is below:
[[Employer Ethereum Address:EthAddress]]
[[Signature Event: EthereumEventFilter(
  contract address: "0x531E0957391dAbF46f8a9609d799fFD067bDbbC0";
  interface: [{"constant":false,"inputs":[{"name":"value","type":"uint256"}, {"name":"owner","type":"address"}],"name":"OpenlawSignatureEvent","outputs":[],"payable":false,"stateMutability":"nonpayable","type":"function"}];
  event type name: "OpenlawSignatureEvent";
  conditional filter: this.owner = Employer Ethereum Address)]]

This event value is: [[Signature Event.event.value]]
# EthereumEventFilter properties
Each EthereumEventFilter type has properties you can use in your template. It will be resolved only once you get an event and only for the first event received.
received - Returns true if an event has been received, false otherwise.
executionDate - Returns the date when the event has been triggered (block timestamp). It doesn't resolve if no event has been triggered.
tx - Returns the transaction hash where the event has been triggered. It doesn't resolve if no event has been triggered.
event - This represents the event object, from which you can access any event property. It doesn't resolve if no event has been triggered. For example, if you have an event MyEvent(address owner), you will be able to access it and return the address set in the event like this: [[Event Filter Name.event.owner]].